Quick Note on MxControlCenter
MxControlCenter |
MxEasy |
There are currently two versions of camera software in use: MxEasy and MxControlCenter. This guide is ONLY for MxControlCenter. MxEasy has its own user guide and is being replaced by MxControlCenter.
Upon opening MxControlCenter, you may be greeted with a “Welcome!” screen or a notification that a camera needs an update. If you are met with either of these messages, or cannot find MxControlCenter altogether, contact tech support as your cameras are not completely set up and/or have an update.

HOT TIP: Right clicking doesn’t do much of anything in MxControlCenter! To access any menu or settings you must click once (left mouse button) and hold until the menu appears. Let go of the left mouse button and you can access the menu.
Viewing/Exporting Footage
Live Feed
After opening MxControlCenter (and no notifications about setup appear) you will be looking at the Live Feed screen for your cameras. From this screen you can zoom, adjust the image and switch between the Live Feed and Footage Lookup for each camera. Keep in mind these settings will not carry over into the exported footage; these adjustments are simply for ease of use while looking at the live feed.

Footage Lookup
Enter the Footage Lookup screen by first selecting the camera you think has the best view of the incident from the list of cameras on the left-hand side of the screen. They may not be named intuitively but looking at the live feed for each should help you determine the best camera. With the camera selected, press the icon that looks like a screen with a play button inside to enter Footage Lookup.
Playback Controls |
Other Functions/Controls |


The variety of controls under the camera footage will now change to the playback controls/functions.
The Playback Controls are (from left to right):
- Move Playback Cursor to beginning of footage.
- Reverse playback at 1x speed.
- Dynamic Playback Control (click and drag mouse left and right to control playback).
- Play at 1x speed.
- Move Playback Cursor to end of stored footage.
The Other Functions/Controls are as follows:
- Playback mode (you only want this mode; if you see a lightning bolt icon where the film reel icon should be, click and hold for the popup menu and change it to the film reel.
- Event Marker (Don’t bother using this).
- Export footage.
- Snapshot.
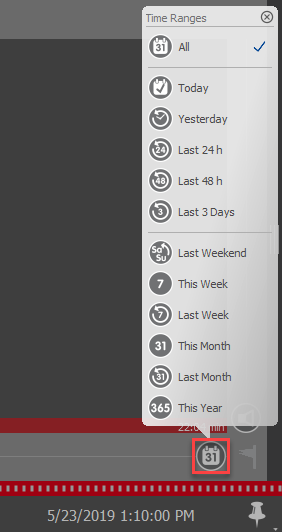
The only other function you need to use in this screen is the Playback Cursor, which is the circle with a calendar icon within located below the footage. Click once and hold on the cursor to change the range of the footage, here you can select common time frames like “Last Weekend”, or “Last 24 Hours”. Change the range to one that contains the time of the incident.
Use the Playback Controls to review the footage until you find the incident. Once you have identified the incident and think you have a good view of the perpetrator, make a mental note of the time frame you will want to export. At this point you can either provide a snapshot by locating the incident and zooming in on the perpetrator and pressing the Snapshot button, or you can press Export Footage.
HOT TIP: You can find out how far back your footage goes by choosing “All”, clicking and dragging the Playback Cursor all the way to the left or by pressing the button in Playback Controls to take you to the start of the footage and looking at the timestamp above the cursor.
After pressing the Export Footage button, a sub menu will pop up. In the upper section you will find the export range. Input the range of footage you wish to export that you took note of previously. You can enter an any additional settings and configurations to the footage as requested by the authorities by a click and hold the “PC” menu. Once all your settings are configured and the export time frame has been defined, click the “PC” option. It will now ask you to save it on your computer, give it a logical name and press “Save”, you are done!

Was this article helpful?
That’s Great!
Thank you for your feedback
Sorry! We couldn't be helpful
Thank you for your feedback
Feedback sent
We appreciate your effort and will try to fix the article