A category page displays a group of products filtered by a section. The page shows custom content at the top (optional) with products automatically populated below based on the section's attribute rules.
Note: Before creating a category page, you must first create a section. See: Creating New Sections for Web Store Pages
For more on how category pages fit into the web store setup process, see: Web Store Setup & Management
Where to Find It
Go to the Marketplaces Tab > Edit Web Store Content.

Bottom Toolbar

- New - Creates a new blank page
- Save - Saves changes to the currently selected page
- Refresh - Repopulates items for the currently selected section based on its attribute rules. Use this after changing a section's rules or item attributes. May take several minutes.
- Refresh All Category Items - Repopulates items for all sections at once. May take several minutes.
- Delete - Permanently deletes the currently selected page
Creating a New Page
Click New in the bottom left of the Web Store Content Management screen

A new page appears in the left column with an automatically assigned ID
It will look something like this:
The Info Tab
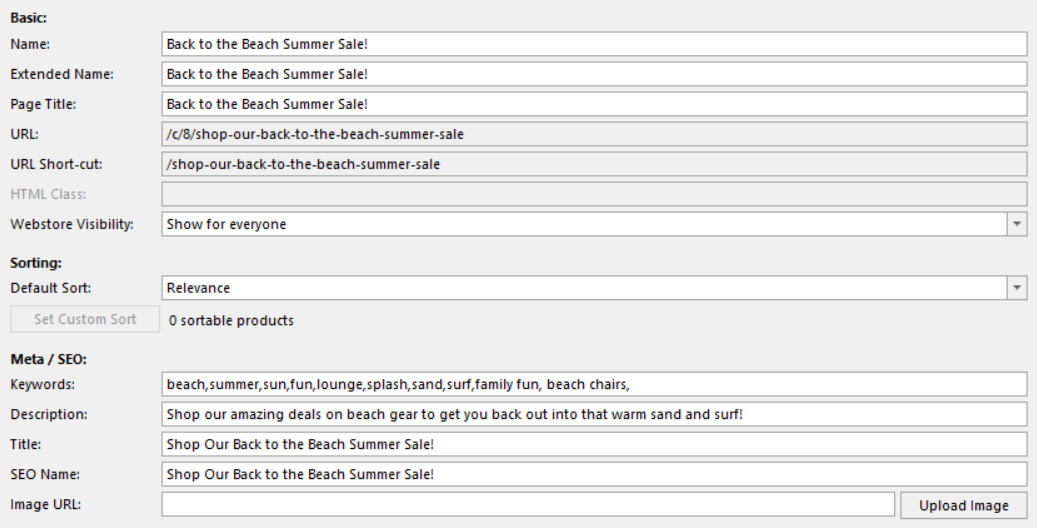
Fill out:
- Name - Internal name for the page (used in the admin view)
- Extended Name - Additional internal name/description
- Page Title - The title displayed at the top of the page on the web store
- Webstore Visibility - Controls who can see the page: Hidden (not visible), Admin Only (visible only to web store admins), or Public (visible to all customers)
- Keywords - SEO keywords associated with the page (used by search engines)
- Description - SEO description that may appear in search engine results
- SEO Name - The URL-friendly name for the page (e.g., "dog-food" becomes yourstore.com/dog-food)
- Promo/Loyalty/Section - Select the section that determines which products appear on this page. This is what makes it a category page.
The HTML Tab
Controls the custom content that appears above and below the product listings
The Layout dropdown controls how products are displayed on the page. Common options include:
- OneColumnPage - Products are displayed in a single-column list format
- ProductCarousel - Products are displayed in a scrollable carousel format
Note: Other layout options may be available depending on your web store configuration.
Content Fields:
- Click Edit Intro to add introductory content that appears at the top of the page, above the product listings (category pages only)
- Click Edit Content to add or edit the main content area (text, images, HTML)
- Click Edit Footer to add content below the product listings
All content fields use the WYSIWYG editor. For more on editing content, see: Editing Web Store Content Pages (HTML & WYSIWYG)

Menu Tab
Controls whether and how the page appears in the web store navigation menu:
- Visible in Menu - check this box to display the page in the customer-facing menu on the web store
- Link URL - optionally enter a URL to redirect this menu item to a different page
- Edit Menu HTML - customize the submenu content that appears when hovering over this menu item

Saving
Click Save after completing your changes. Always verify the page on the live web store to confirm the expected products are showing.
Was this article helpful?
That’s Great!
Thank you for your feedback
Sorry! We couldn't be helpful
Thank you for your feedback
Feedback sent
We appreciate your effort and will try to fix the article